Staging A WordPress Website: The Best Option


Staging A WordPress Website: The Best Option

When building a professional, mission critical WordPress website, creating a staging environment is absolutely essential to your management workflow.
This ensures that you can test out all potential changes and new features on the same hosting environment as your live website without pushing any changes to your valuable visitors. If I change that you were planning on implementing breaks the staging website, there are no real world repercussions.

Unfortunately, many website owners and web masters failed to set up a staging environment for their word press website, leading to major issues when updating plug-ins and adding new features. Sadly, it is quite difficult to implement WordPress staging but using a plug-in or other third-party software. We wrote an article testing out some solutions, and they’re all way overpriced and don’t offer the features that any major website would require when staging.
A major issue with any active content website is the fact that you are constantly adding to it. This makes it impossible for you to manually duplicate the website, install the required changes, test on the backend, and then push live, as you would overwrite content that was added after duplicating and downloading the website.
Because there are a limited selection of high-quality options when it comes to staging a WordPress website, many users are forced to make changes on their live website, or seek other alternatives.
The one shining light when it comes to this aspect of WordPress development and maintenance is the fact that many high-quality hosts offer staging utilities that easily duplicate the website, push content between both instances, and make it easy to merge those changes to the live website once complete.
As a digital agency managing many client website throughout many hosts, we have had the opportunity to test and use many staging set ups.
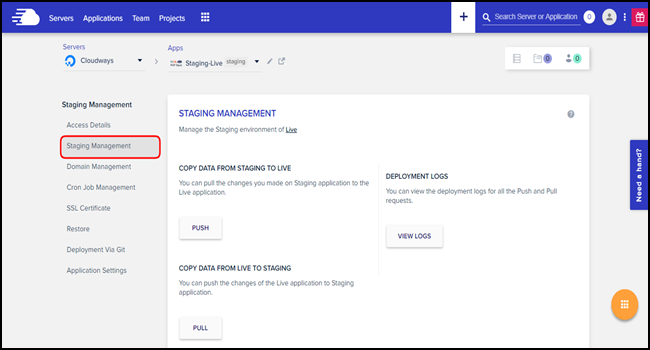
Most set ups allow you to duplicate the website, copy data from the live installation to the staging installation, and then push data and changes made on the staging application to the live website. Of all of the staging set ups that we have used, the Cloudways offering is the best.
It is also quite simple to set up. First, you duplicate your application, which can be hosted on an alternative server. We typically duplicate our application onto the same server as there is virtually no load due to the fact that the staging environment gets no traffic, and we can test any changes on the same server environment that our live website is on.

Once the website is duplicated, you have three options. You can copy data from the staging website to the live website, meaning that it is easy to push any changes that were tested on this dating website to your live website. You can also pull data from the live website to your staging website. This is incredibly useful if you published a new blog post, and need to update your staging environment. Finally, you can view the deployment logs for all the push and pull requests. Couple this with the automatic back upstairs Cloudways offers on both environments, and you should be good to go for all your staging needs.
This article was more of an opinion piece, but the main take away is that you should who is your website on a reputable platform that offers staging management utilities, and implement this aspect of website maintenance into every day workflow. Staging is absolutely essential, and many high-quality hosts offer this for free. There is no need to use a plug-in, and there is no excuse for breaking your website after reading this article!


